The U.S. Army Drill Team uses bayonet-tipped 1903 Springfield rifles to perform intricate, synchronized routines with split-second precision and timing. But the HHC, 4th Battalion, 3d U.S. Infantry Regiment aren’t the only ones coordinating their movements. Coordinate measurement machines use a probe-tipped head that surveys part features with extreme accuracy. But have you ever wondered what the difference is between conventional systems that use indexing heads or fixed probes and 5-axis measurement technology?
Like the Army Drill Team, Renishaw 5-axis technology synchronizes the motion of the CMM and head axes to reduce the machine’s potential for dynamic errors at ultra-high measuring speeds.
CMMs equipped with conventional measurement methods perform the movements needed to gather surface data. Acceleration causes the machine’s structure to experience inertial deflection which is a major contributor to measurement errors. Manufacturers have worked to develop techniques capable of reducing errors but the structure and servo system stiffness of these machines limit higher speeds, making data unreliable.
Five-axis technology on the other hand breaks that ceiling by using an articulating head that moves on two rotary axes. This capability frees the CMM to move at constant velocity in a single vector while measuring. Because the head is lighter and more dynamic than a CMM and has a better bandwidth, it's able to quickly follow part geometry changes without errors. This means faster surface speeds and shorter measurement cycles.
To be more specific about traditional approaches, bladed discs or ‘blisks’ carry extreme access challenges and typically require numerous head indexes. Renishaw’s 5-axis products significantly reduce cycle times by continuously scanning blade sections and surfaces as well as root profiles.
For example, let’s say you need measurements for nine sectional scans, eight longitudinal scans and two root profile scans per blade. Three-axis scanning at 10 mm per second for one blade takes 46 minutes. Twenty-two blades takes 22 hours and 14 minutes. Enter 5-axis. Renishaw’s REVO-2 5-axis measuring head measures at 200 mm per second. One blade takes 4 minutes and 30 seconds. Twenty-nine blades takes 2 hours and 10 ½ minutes. The takeaway? You just increased your throughput by 922 percent.
We’ve looked at 5-axis technology and compared its performance to other measurement methods. But how does it really work? What is it? It's based on advanced head, sensor and control technology. Unlike some of the other methods we’ve mentioned, 5-axis motion allows the stylus to follow a continuous path around highly detailed components, without having to leave the surface of the part to change a stylus cluster or index a head. The technology employs controller algorithms to synchronize the CMM and its head motion to produce the best tip path and reduce errors.
Let’s look at another example. For automotive manufacturers, a valve seat and guide is one of the toughest measurements to perform. The REVO head uses a helical scan to gather thousands of data points that allow a fabricator to determine height, diameter, seat width and form. Three-axis scanning of 12 valve seats and 12 valve guides at 15 mm per second takes 29 minutes and 13 seconds. The REVO head is able to scan at 400 mm per second and 50 mm per second completing measurements in just 3 minutes and 42 seconds for an increase in throughput of 690 percent.

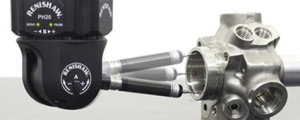
Renishaw’s touch-trigger 5-axis PH20 takes on a traditional motorized indexing head in a similar exercise. Measuring eight bores in a valve block with a 3-axis motorized indexing head took 1 minutes and 52 seconds. The PH20 measured the valve block’s eight bores in just 37 seconds for an increase in throughput of 300 percent.
| Parts |
3-axis Measurement |
5-axis Measurement Time |
Throughput Increase With 5-axis |
| 22 Blades | 22:14:00 | 02:10:30 | 922% |
| 12 Valve Seats and 12 Valve Guides | 00:29:13 | 00:03:42 | 690% |
| 8 Bores | 00:01:52 | 00:00:37 | 300% |
Pairing 5-axis technology with the hardware is another way to boost performance. Renishaw’s REVO 2 combined with the Revolution Series LM gives manufacturers a multi-sensor 5-axis measurement system. Depending on part application, a manufacturer can employ high-performance scanning, non-contact inspection or surface finish analysis.
The Revolution Series HB equipped with Renishaw’s PH20 gives manufacturers the first truly mobile 5-axis measurement tool. Laboratory-grade or mobile model, both 5-axis enabled CMMs are faster to calibrate. Calibrating a CMM with a traditional head takes a considerable amount of time. The simple, practical calibration technique for the REVO-2 determines the actual head and probe geometry in any position from a single operation in less time.
A case for 5-axis measurement technology? Numbers don’t lie.


