%20is%20a%20bridge%20over%20the%20Rio%20Negro%20with%203595%20meters%20of%20length%20that%20links%20the%20cities%20of%20Manaus%20and%20Iranduba.%20It%20was%20opened%20on%20Oct%2024%2c%202011.jpeg?width=771&height=474&name=The%20Manaus%20Iranduba%20Bridge%20(called%20Ponte%20Rio%20Negro%20in%20Brazil)%20is%20a%20bridge%20over%20the%20Rio%20Negro%20with%203595%20meters%20of%20length%20that%20links%20the%20cities%20of%20Manaus%20and%20Iranduba.%20It%20was%20opened%20on%20Oct%2024%2c%202011.jpeg)
We’ve all said it: An extra pair of hands makes the job that much easier. Whether it’s yard work, shoveling snow from a neighbor’s driveway or cooking Easter dinner for a large family, extra help is always appreciated. On the shop floor, an extra pair of “hands” can be equally useful - especially when it comes to measuring parts and bridging the gap between the lab and parts inspection.
Let’s say you need a lab-grade coordinate measuring machine (CMM) with scanning capability. But you also want to automate your production line and measure parts being cut on a machining center so that adjustments can be made based on real-time measurements.
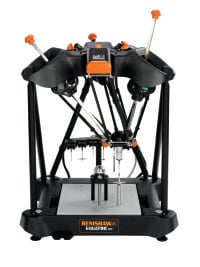
 With the help of a radical alternative to traditional dedicated gauging, you can extend the inspection capacity of your CMM to the shop floor without removing the machine from the laboratory. Renishaw’s Equator can bridge the gap between the lab and production parts that require inspection. A comparator (a device for comparing a measurable property or thing with a reference or standard), the Equator has the flexibility to support continuous part fabrication or production of diverse parts assigned to regular batches. Typically, custom gauges are just that - designed for one part. The Equator can switch programs and fixtures in seconds for medium to high volume applications.
Pairing the Equator with a lab-grade CMM like the Revolution Series Linear Motor (LM), allows an operator to have the best of both worlds. The Equator can be mounted on a bench top or enclosure to measure parts at any point in a production line. The LM sends part data to the Equator which in turns measures the part removed from production by a robot. The Equator then talks to the machining center so that it can make real time adjustments.
Operators don’t have to run parts to the laboratory, which saves steps and time while improving efficiency. Since the Equator is mobile, a company gains the advantage of portable part measuring anywhere on the shop floor, while retaining the LM’s advanced measuring platform. This platform is fully equipped with next generation 5-axis probing technology and CAD design technology, allowing the LM’s flexible and precise instruments to carry out measurements in point-to-point mode. It does this by using contact sensors or by using its “umbilical” to the Equator out on the shop floor.
In addition to the LM, the Equator can also work in concert with the Revolution Air Bearing Small Bridge (SB) CMM and the Revolution Air Bearing Large Bridge (LB) CMM. Manufacturers that need to measure core aspects, or perform activities that include incoming inspection, machine setup, process control and final inspection should consider the Small AB. The economically priced lab-grade machine features a granite frame with air bearing guide ways lapped for close tolerance accuracy. Air bearings are self-cleaning and wear free. The machine is supported by Renishaw 5-axis PH20 technology and Modus software.
The Revolution® Air Bearing Large Bridge CMM is suited to measuring larger components. Robust and easy to maintain, the Large AB is wear resistant and free of internal tensions, thanks to its raw material - granite. Granite construction also ensures thermal stability and intrinsic accuracy for precise inspection of free-form surfaces and geometric elements with Renishaw’s 5-axis technology and Modus software.
When quality inspection demands for production parts make you wish you had an extra set of hands, consider the Equator partnered with a stationary lab-grade CMM. Tell us what your application requirements are and we’ll help you pick the right combination.


